Configuration and post install I2p
What do I expect by this point?
By this point, I expect you have already installed and got to the I2p router console window. If you havent already, you may need to follow the steps for your operating system from Page 2: Install I2p on your desktop if you have missed it. After this point, it is operating system independent. Maby I should again mention that if you didnt get to the router console window automatically, you may need to manually open up your browser and goto the link: 127.0.0.1:7657/home (For security reasons, you cant just click on this link. You will need to copy paste the link manually into your browser) to manually start your router console.
After the router console window has started
Set appropriate Bandwidth
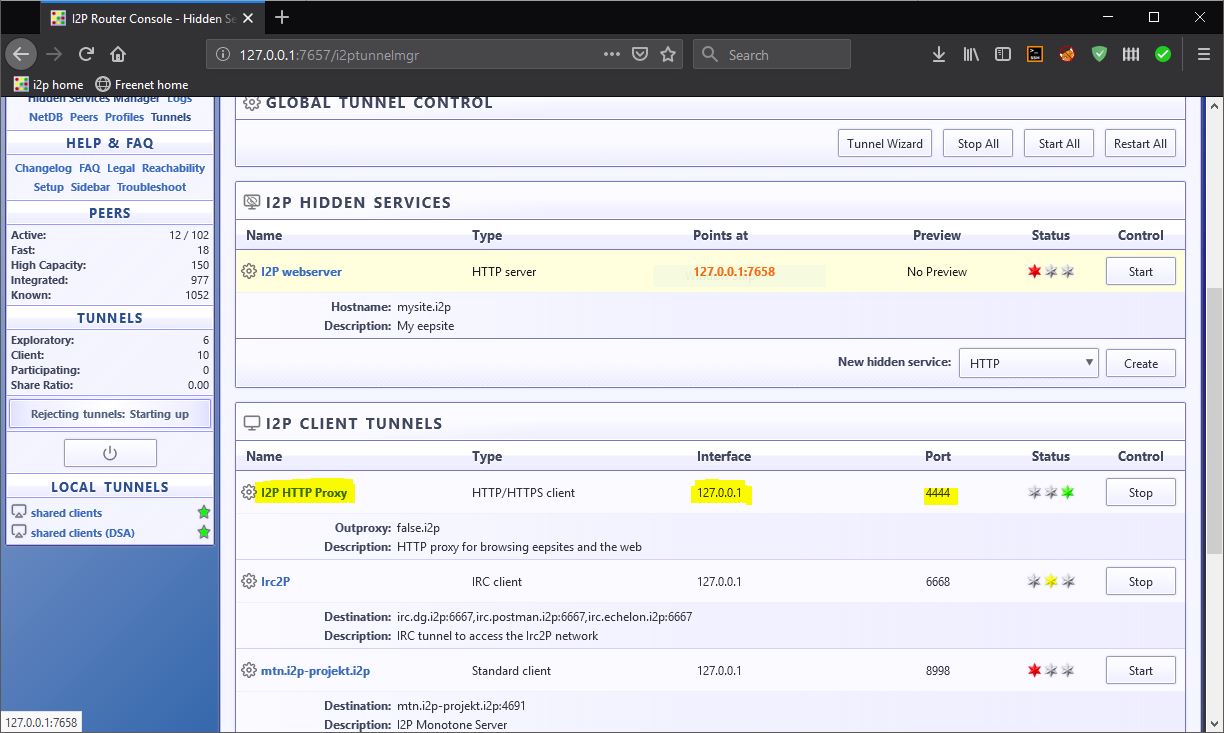
 |
| Fig: i2p router console |
Your router console should look like the one above. The first thing I suggest you do is scroll down and select to configure bandwidth. There, you should setup KBps in and KBps out as per your network bandwidth that you want i2p to use. It doesnt matter if that is more than your internet speed. The third option is to share bandwidth with the network. I2p traffic are bundled and encrypted. Sharing more bandwidth will help the network as well as make you blend in the crowd. I suggest you set it to 20% at minimum. Then click on save
Get some addresses
By default, depending on the version, you may not have any addresses in your Addressbook. To get addresses to some popular websites, you may want to subscribe to them. Here are some subscriptions you may consider,
- http://i2p-projekt.i2p/hosts.txt
- http://stats.i2p/cgi-bin/newhosts.txt
- http://no.i2p/export/alive-hosts.txt
- http://identiguy.i2p/hosts.txt
To add these to your subscriptions list, Goto AddressBook, which is beside Configure Bandwidth option, goto Subscriptions tab, then paste all those links above in the text field and click on Save.
Start Tunnels
Click on Local Tunnels

For the sake of keeping this simple, assume different tunnels to be different services. Which means that you will need to start each tunnel to start the respective service. HTTP proxy is started by default when you start i2p. When you are in the Local Tunnels page, keep note of the Interface and port it uses. You will need it later to configure proxy settings to access that service. For other services such as a mail server, IRC and torrent, you should first start the respective tunnel, then configure your application to send its packets through that tunnel's interface and port by setting up a proxy. Keep in mind that it will take some time to configure and connect to a tunnel. You will need alot of patience.
Configure Browsers to use I2p and browse EEP sites
EEP sites are the hidden services in i2p. These sites cant be accessed from the normal internet and require the use of I2P router to access them. For this, you will need to proxy your browser through the HTTP Tunnel. I recommend you to have a different browser only for I2p. Note that I2p uses HTTP connection and not HTTPS. Because contents are encrypted anyway, it doesnt matter whether SSL is used or not. So, for I2p, it is suggested you disable HTTPS everywhere extension while you are using I2p or you may face issues.
Firefox
Firefox is the best choice for I2p as it is regarded the best browser in terms of privacy. To configure Firefox, click on the three Dashes and select Options. Search for proxy settings and click on Proxy. Click on Manual Proxy Configuration option. Then set 127.0.0.1 as HTTP proxy and 4444 as proxy port, same as that in HTTP Tunnel in the Local Tunnels page.


Optional: Disable localhost forwarding through proxy in Firefox
It is not necessary to do so if you are using official Mozilla Firefox. However, there are certain modded Firefox build that forward localhost traffic through the proxy. It will cause problems with I2p. To disable this behavior, goto about:config (For security reasons, you cant just click on this link. You will need to copy paste the link manually into your browser) in firefox and search for network.proxy.allow_hijacking_localhost and set that to False.
Recommended: Install NoScript addon on your firefox browser
Despite being welcoming and helpful, it is important to realise that I2p is still an anonymous darknet network meaning that anyone at any point can be hosting the websites. For this, you can install NoScript addon onto your browser to block all the scripts. Blocking scripts not only make I2p faster but also enhance your security.
Chrome
Chrome will use the default proxy setup used by your Operating system. To change the proxy settings for Chrome, you will need to set the desired proxy setup in your Operating System.
Loading the first EEPSite
If you have setup everything correctly, then its time to load your first website. You can click on any of the links available on the homepage. You will need alot of patience as I2p is generally slower.
After you have seen any one of the websites load up from the homepage, you may wish to continue to Page 4: Finding and exploring i2p darkweb sites to learn how to read and access other websites in the I2p network. At the end, I have also provided some links to some websites that I frequently use.
After you have seen any one of the websites load up from the homepage, you may wish to continue to Page 4: Finding and exploring i2p darkweb sites to learn how to read and access other websites in the I2p network. At the end, I have also provided some links to some websites that I frequently use.

Comments
Post a Comment